The arms are actually replacements for the Chopper I. The base is a piece of MDF I cemented some Formica to. (A scrap from a previous workbench.) I drew a line across the base, about 1-1/2" from the top, and clamped a heavy, metal straight-edge along that line. Next I cut a brass I-beam to length, then snugged it up to the straight-edge. After that I drilled holes through the I-beam, into the base, and secured it with tiny screws, making sure the beam did not deflect away from the straight-edge as I tightened them.
Now to the left arm. (This one would make 90° cuts only.) These arms are designed to be bolted through from underneath. I placed the arm where I wanted it, marked the location of the bottom screw hole, then drilled down from the top. Once through, I made a countersink from underneath, then bolted the arm down snugly, but not tightly. This allowed me to hold one side of a small square (you can see it under the X-acto blade) against the I-beam, then pivot the arm until the blade was tight against the other side. I had achieved 90°ness. Now I could mark the location of the top hole, drill, countersink, and bolt it down. Finally, I took a 6" section of ruler, and screwed it against the I-beam.
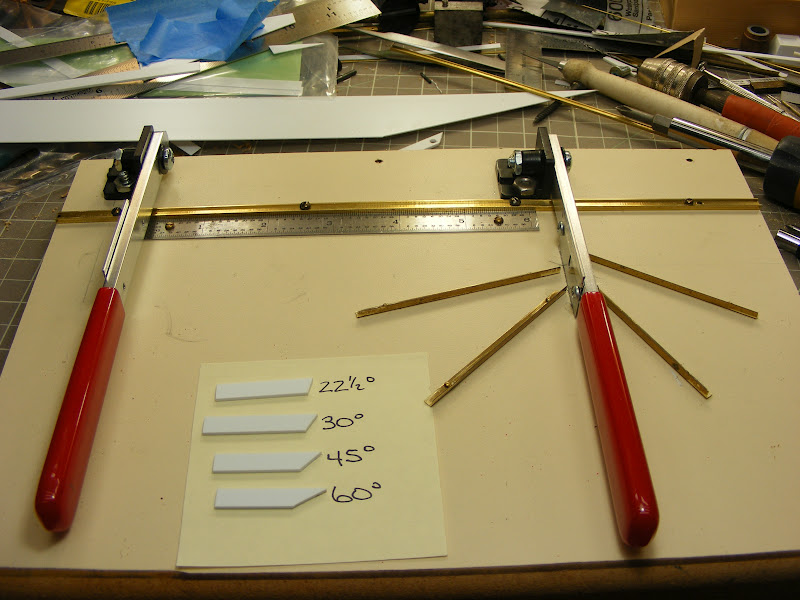
Now to the right arm. I wanted this one to make common angle cuts. I considered having the arm pivot from side to side, but that wasn't practical. So I attached this arm the same as the other. You will notice I have the arm against the I-beam. This is so the blade of this arm does not interfere with the cutting lane of the other arm. Next I cut four 3" lengths of brass angle, and drilled two holes in each. Now I used triangles to position those pieces. I had a 45-45-90° triangle, and a 30-6-90° one as well. I had to make the 22-1/2° angle with some styrene and an angle finder. I located, drilled and nailed the two bottom pieces, then did the top two. I spaced them so each position would handle a strip up to 1/4" wide.

And here are my test cuts.

A closer look at the ruler.

Finally, I took some styrene scraps and two magnets, and made a depth-stop which snaps onto the ruler.


The arms are available from Walthers. Maybe you'll be inspired to make one of your own.
Don
No comments:
Post a Comment