Sunday, September 25, 2011

Paneuropean Mk.III & -B, Pt.3

I know, I know. I said the last variation of the Mk.III-B would be the last variation of the Mk.III-B. However, I had a few responses on the OGRE Forums that made me think. The first was from NOrthy who said, " the shape just feels a little 'top-heavy'. If the lower parts of the double-fin were smaller and more like short support struts while the upper portion was larger and closer to the original single pylon it'd feel more balanced. Some shape to the platform might be nice too, more trapezoid in nature to help the front 'flow' into the back while still being somewhat angular."  That sounded a lot more like what I wanted. So instead of using the bottom portion of the towers, I used the tops. This had a shorter profile with a more delicate structure. (If you can actually use the term more delicate to describe an OGRE.) I was getting closer.


Then 'ladue' pointed out that the Paneuropean Fencer and Doppelsoldner didn't have towers at all, and suggested a much lower and subtle approach. That made the most sense of all. This is what I came up with.


Maybe it's more Oriental than European, but I like it. Let me know what you think. Don

Friday, September 23, 2011

Paneuropean Mk.III & -B, Pt.2½

OK, I think this all the farther I am going with this project. I've made a few changes that mostly satisfy me.
First I cut off the tops of the towers.


Next I cut a small strip of styrene to join the lower towers. The glue joint on the upper tower of the previous version was pretty weak, so I drilled and pinned it with a brass wire.


I drilled two holes on the underside to give more glue surface.......


..........while allowing me leeway to set the platform level.


If it turns out I don't like this arrangement, I'll abandon the two-tower concept and go back to a single tower. So far I'm OK with this set-up, but who knows how I'll feel in the morning. Your comments always welcome. Don

Wednesday, September 21, 2011

Paneuropean Mk.III & -B, Pt.2

A little housekeeping to start, I added three photos to Pt.1 of this project.


Now to the Mk.III-B. I really didn't like it almost as soon as I made it. I'll admit it, I took the easy way out. (Oh, the power of the Dark Side.)  I decided to go back to my original concept of the pylons being farther apart and pointing straight forward. I managed to break the glue bond without too much drama. I was afraid the main batteries would be damaged during construction, so I tried to remove them as well. Gentle flexing didn't break the joint, so I was forced to break the guns off.  Now for some tricky cutting and filing.

This time I didn't cut the towers in half, I would use them full height. The problem I had was the length of the tower's base was greater than the width of the flat spot above the main guns. Since I didn't want anything overhanging, I needed to cut some triangular slots in the superstructure. Using a tower as a guide, I scribed the slots location, then using a razor saw I cut two lines deep into the model. Then for the next hour and a half, I used files, rasps, knives, and a cutter in a Dremel to carefully remove the material in-between. Even going slowly and deliberately, the slot ended up too wide. When I placed the tower in the slot, it was perfectly flush with the outside edge of the slot, but there was a huge gap on the inside. OK, I thought, putty should solve that problem, so I moved over to the other slot. I began again by scribing and sawing, and after a few minutes with a knife thought, Screw it, this is way too much effort for a simple wargaming miniature. So, I used the Dremel to grind the top flat enough to accommodate both towers. This is what I ended up with.


I like this arrangement better than the first, but it's still not perfect. There is some more tweaking to be done. Oh, the main batteries?  I drilled small holes in each gun and in both turrets where they broke off. I used brass wire as reinforcing pins, and CA'ed them back together. You can't tell they were ever off.  Please let me know what you think of this arrangement. Don

Monday, September 19, 2011

Paneuropean Mk.III & -B, Pt.1

I wanted to give my Paneuropean forces some actual OGREs to go along with my PE-produced Fencer and Doppelsoldner models. As Warehouse 23 only had Mk.III and Mk.III-Bs available, I decided to start there, and ordered a couple.  (Even before receiving this order, I felt I needed to get some more. I went back to the W23 site just 3 days after the first order, and all they had left was the Mk.III-Bs. If you need to flesh-out your armies, you'd better hurry.)

According to the 'history', the Paneuropean Federation gained access to OGRE templates when Great Britain fell and they captured the Sheffield manufacturing  plant. Even so, I wanted my PE OGREs to have some differences that would make them easily identifiable as Federation units, as opposed to the Combine OGREs.


 I started by gluing  .015" x .125" styrene strips  flush with the outsides of this Mk.III's treads. Now I have a confession to make here. Originally, I didn't do this to make a distinctively-Paneuropean OGRE. I did it because the tops of the treads  had a lot of sink-hole defects, and the gap between the treads and superstructure was enormous.


The strips covered the defects and hid the gaps. But their 1/8" width made the treads sit wider on the model. "Ah-ha," I thought, "that's the Paneuro Distinction." 


I also added these shims to the inside bottom of the  treads so the model sits more level.


The tops of the treads are actually longer than the rear section, requiring some small styrene strips at the front.


The magnet assembly to hold the sections together.  See how the front one sits in a recess that will 'capture' the one glued to the upper-inside of the rear. The blue in the holes for the secondary batteries is Magic Mask. It is a rubbery liquid you brush on where you don't want paint to stick. It dries quickly, and you peel it off when you are finished  painting. I'm doing this here so I'll have bare metal-to-metal surfaces when it's time to glue in the secondaries.


(EDIT: This picture added.)


(EDIT: This picture added.)


Now we move on to the Mk.III-B. Kind of looks like a frog. The space under the 'eyes' is begging for a Flying Tiger-like painted mouth. I'll have to see what I can work up. This set comes with double guns and towers. Here was a chance to do something I've wanted for a while. I started by covering the tower base with a piece of styrene. Next I carefully cut both towers apart at the seam with a  razor saw.


I glued the two lower pieces to the sides of the original base.


I connected the two with a semi-circular wedge of styrene, then added one of the uppers on top.


The arrangement of the magnetic pivots.


(EDIT: This picture added.)


Here I've moved the upper tower back on the wedge. Not sure how I like this arrangement. When I originally considered doing this on one of the larger OGREs, I felt the two towers should be farther apart, and definitely both pointed straight ahead. That would require some fancy cutting and filing of the towers, or hacking into the superstructure, something I'm reluctant to do. However, the more I look at this, the more I think that is what I need to do. What do you think?. Let me know.


Another conclusion I've come to is I didn't take enough photos of this project. I'll see if I can't take care of that as quickly as possible. (EDIT: Added three pictures.) Thanks for looking, and as always, comments and questions welcome.  Don

Wednesday, September 14, 2011

Things OGRE

Kind of a hodge-podge today, all OGRE, but none large enough for a dedicated thread. Let's begin.

I've got several orders that should arrive in the next few days. The first is an order from Warehouse 23. I ordered most of what they have left. The main prizes are two Mk.III and one Mk.III-B. I also tried to load up on howitzers, light tanks, and GEVs. I may go back for some more of both Mk.III variants. The second order is from Walthers. Mostly Evergreen and Plastruct parts that lend themselves to scratch building in the OGRE universe. The third is an order from MicroMark. More about this later.

Since anything larger than a Mk.IV seems to be unavailable, I am contemplating scratching the unreleased and 'classified' Mk.VII. There is a fair amount of information on it in the Update and on the web, some official and some not so much. So I examined the various choices of armament, and came up with what I wanted in an Uber OGRE. First, four main batteries and eight secondaries. The Record Sheet shows  two howitzers, and I like that idea. The Sheet also shows twelve external missiles, with an extra twenty-four drone-reloads. I prefer them to be one-shot, with four missile racks and sixteen internal missiles added instead. Finally, I'll install twenty-four antipersonnel weapons.

A front section slightly larger than a Mk.VI would accommodate the four mains and eight secondaries with no problems. The two howitzers and the four more-than-usual external missiles could not be added to a standard size rear section. Simply lengthening it would make it too 'Fencer-like.'  I always envisioned an OGRE as twisting and turning, tearing up a battlefield. To my mind, that maneuverability would be best accomplished by a smaller middle section. OK, I had my basic layout, now I needed some visual aids to help me flesh it out.

Here is a quick and dirty model I threw together to test my design layouts. The front is only a little bigger than a Mk.VI, and on my model is 1-7/8" wide x 2" long. You can see it is large enough to handle the four main batteries and the eight secondaries. I penciled in a trapezoidal arrangement with the two lower mains outboard of the two upper. I will also try it reversed, as well as one above the other on the center line, with the other two on either side.


The middle section houses the howitzers and four of the external missiles. The platform measures 1-7/8" x 1-1/4". The howitzers will sit higher on a raised superstructure, while the missiles will remain at that level. The treads are wider on the ground, not sure I really like this. The rear platform is 1-7/8" x 1-1/2", and contains the four missile racks and the remaining eight external missiles.


I read somewhere this Mark didn't have the standard triangular tower. I'm going to try a submarine-style conning tower, though it will angle upward toward the back. The tower here will be larger and higher, sitting on a central spine.


I really like the main battery housing of the Mk.VI and the missile racks of the Mk.IV, so I made a couple of silicone molds of those features. They came out well, showing all the detail. So I grabbed the two-part resin bottles and...........uh-oh, the part-b bottle was thick and dark. I tried stirring it as best I could before mixing it with part-a.


Unfortunately, it had gone too bad. I was left with these two castings, which are only slightly firmer than a marshmallow. Fresh resin has been ordered, and that's the third order on the way.


Here is a gun tower I'm working on. I haven't decided exactly what armament will go on, but aiming it will be no problem. As you can see in the second picture, the gun swivels around in its housing, while the whole tower pivots in the base.


I was looking through all my plastic models for any spherical parts, and  I found these 280mm German rockets. Not too bad, but I do have some acrylic balls on the way, so I may be upgrading.


That's all for now. I should have a lot write about once all those orders come in.  Don

Friday, September 9, 2011

OGRE, Unger, Segues, Down

I don't know what made me think of Steve Jackson's OGRE miniature game, but it is the impetus for this new blog. I pulled out my box of OGRE minis, and looked them over. All of the tanks were assembled and primed. They will be painted once I determine the color scheme I like. Even though these OGREs are 1/285th scale, they are large and heavy, coming in two pieces. I guess the designer intended the two to be super glued together, but that is a joint doomed to fail. I wanted someway to keep them firmly connected during play, but with a joint that had some flex to deal with 3-D terrain. Let me think, now what could allow me to make such a joint. Hmmmm, could it be................Satan, er, I mean magnets? Yeah, magnets. (Like you didn't see that coming.)


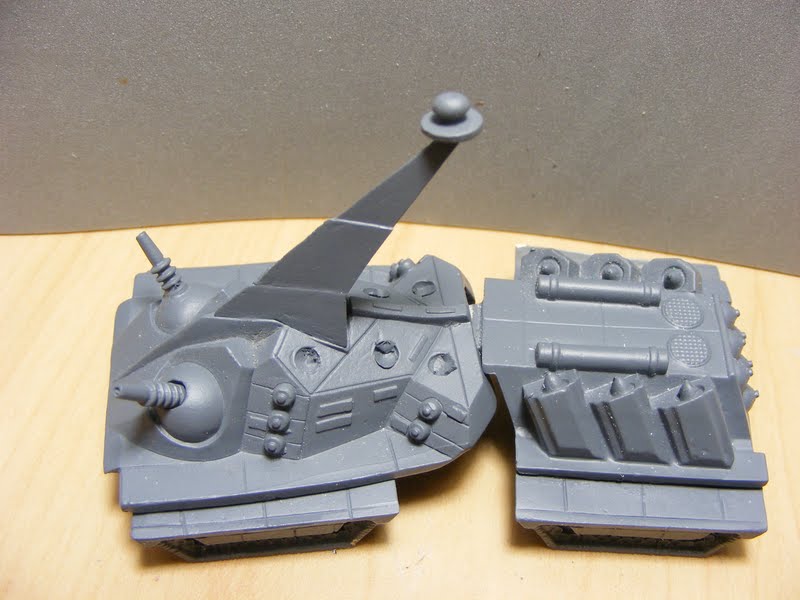
This is an OGRE Mk-V, it's six long guns yet to be installed. You can see how fragile the joint is between the front and rear. (Yeah, that dimple will really help.) 


I started by filing that dimple off and drilling a hole in the tab to fit the 1/8th" diameter magnet. (It's 1/16th" thick.) When drilling metal or plastic, I like to start with a small bit and sneak up to the final size, especially when there will be such a small margin of material left around the hole. I used four bits to do my sneaking.


I pushed the magnet in from the bottom and used thickened CA to secure it.


The section where the other magnet would go was pretty thin. I was barely able to get to the 1/8th" diameter before going through the other side. Basically, all I had was the cone shape of the tip of the bit. This would not secure the magnet. I took a high-speed cutter in my Dremel, and flattened the hole.


Even so, the hole was not very deep. You can see how much of the magnet protrudes. Oh wait a minute, look at the other magnet, it's recessed. That recess captures the upper magnet, creating a perfect pivot point. Don't you just love it when problems work themselves out on their own?


The completed joint. There is a lot of play in it, yet it is firmly connected.


This is the Mk-VI variant. It went together essentially the same as the first one,  though I had to use the Dremel to cut some material around the upper magnet.


Here it is, the largest OGRE produced to date. There are record sheets already for a larger Mk-VII OGRE, but who knows if or when Steve Jackson will make it. Hmmmm, that might make a nice scratchbuilding project.


This is the Mk-IV, and it required the most work of the OGREs. I started with this piece of styrene to hold the magnet and attach to the front unit.


This is the piece cut and filed to fit the slot in the back end. You can see how I had to file the bottom of it, as well as the top of the front end's piece, so they would clear each other.


It was a tight fit, but I secured it with CA anyway.


The Mk-IV ready for paint and its two long cannons installed.


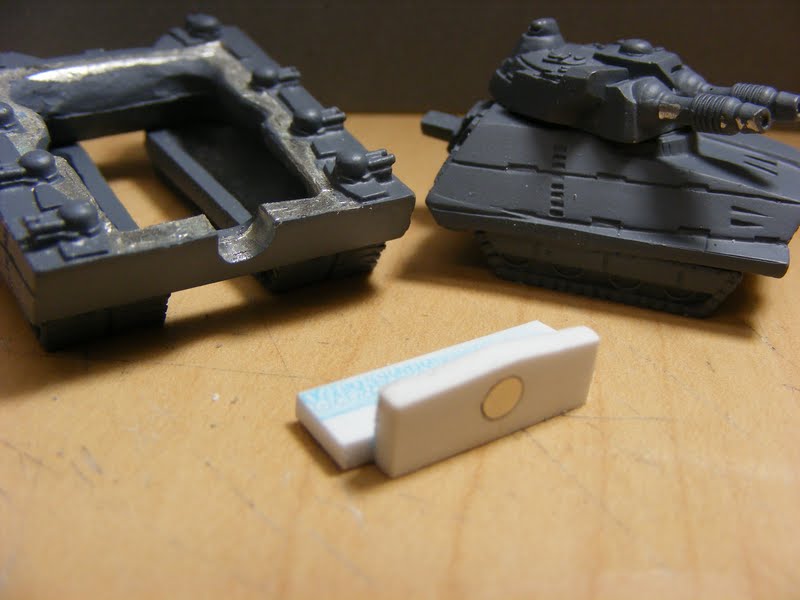
I should mention here that OGREs are the weapons of the side known as the Combine, basically North America and Great Britain. This following super-tank is a Fencer, the OGRE-equivalent of the side known as the Paneuropeans. (Guess where they're from.) The fencer has a choice of two main turrets, and with a few magnets are easily interchangeable.


Fortunately, to simplify painting, I hadn't yet glued the top half of the rear section to the bottom. This really worked to my advantage. You can see how weak the intended joint would be. I started by cutting a piece of styrene to fit behind the cut-out in the bottom rear, and installed a magnet.


I was afraid there wouldn't be enough glue surface to firmly hold it, so I cut another to fit flat to the tops of the treads. Then the piece with the magnet will glue to the top of it.


I trimmed some solid rod to fit the models stub, then glued a magnet on. Before attaching it to the model, I used some pliers to bend the stub down so the assembly would be level.


I had to pull out the Dremel again to enlarge the U-shaped trough to allow more movement.


The rear top in place but not yet glued down.


This is the Paneuropean's behemoth, the Doppelsoldner. This joint is incredibly strong. In fact, you can pick up the whole model holding only one side or the other without them even being glued. It's those ribs with the interlocking grooved recesses.  But remember, I was looking for firm and flexible. So first I made this magnet holder out of styrene strip.


I glued the magnet on to the front connector, and to allow some play in the joint, I filed off two of its ribs. I also had to file off one rib from each of the rear connectors.


Almost ready to kick some OGRE butt.


I'm pretty close to picking a paint scheme, so the next time you see these bad boys, they should be a lot more colorful. See you then. Oh, did anyone get the title of this post?   Don